Aerial Equipment part 5: Rust on my Lyra (Cleaning, Painting, Re-taping)

II’ve had my Lyra for over 8 months. I’ve brought it into studios and used it on my outdoor rig. I still love it! Most of the time it is stored inside in my dance room which is air conditioned yet about 2 months ago it started to rust through the tape. I live in Florida where the humidity is very high. It is possible that I set my hoop down in wet grass or something. I’m not exactly sure why it is rusting. I’ve been busy but it has reached the point that it is time to clean off the rust on my hoop and re-tape. Basically, make it pretty again.

These are the “before” pictures as I was taking off the tape. It was really pretty disgusting.

I needed to start my research again to figure out the best way to do this…

I opened Facebook on my laptop and went to the Safety in Aerial Group. I knew I had read about ways to clean and re-tape your hoop in some of the posts. I plugged “rust” into the search bar and started reading.

This is what I found:

Yes, other people have this problem. Probably, the best way to solve it is to have it powder-coated (or to have bought a stainless steel or aluminum hoop to begin with…). Well, I’m not ready to make the powder-coating leap yet. So I’m going to start by cleaning it.

Suggestions for cleaning it:

  • Use steel wool to clean the rust off (Grade #0 Fine did not work)
  • Use 200 grit sand paper to clean the rust off (When I spoke to one of my aerial instructors this is what she has done in the past. This is also what worked the best for me.)
  • Use 3M Scotch-Brite General Purpose Hand Pad to clean the rust off (This helped get the dirt grime off but didn’t really see it get rust off.)
  • Use Navel Jelly to dissolve the really stubborn rust off (You can buy it at Home Depot. Use gloves & do it outside. I did not actually need to use it but its good to know & have on hand.)
IMG_9577

Cleaning supplies

Keep it from rusting:

After cleaning it there were several suggestions on how to keep it from rusting again.

  • Powder-coating (I’ll look into this in the future but right now I’m trying some other things)
  • Oiling/lubricating (It would probably work but I’m having a mental block about putting oil onto an apparatus that I’m going to be hanging from…):
    • Sentry Solutions Marine TUF-CLOTH to stop the rust
    • T-9 Boshield to protect the metal from rust. This was copied from the Boshield website “T-9 dries to a waxy, waterproof finish without leaving a sticky film.” (you can buy it at any woodworking store)
    • FYI: W-D 40 does not protect from rust.
  • Spray painting (use Rust-Oleum or Kyrlon Hammer Finish)
  • Taping and putting a coat of acrylic paint over it

I decided to try to clean it the best I could. Use Rust-Oleum to paint it. Then re-tape it. I read that several studio owners do this but they need to re-do it about twice a year. I will try and and report how it does in future posts.

My process

Cleaning the hoop

  1. I took all the tape off
  2. Then I started cleaning. I took it outside and started with the steel wool.
    IMG_9579

    Steel Wool.

    I went through 2 pads before I realized it wasn’t really doing anything. I was using the “Grade 0: Fine” steel wool. Maybe this wasn’t tough enough.

  3. The steel wool was actually sticking to the left over adhesive. So I went and found some GOO GONE and a rag and started wiping the adhesive off. That really helped.

    IMG_9580

    GOO GONE!

  4. That’s when I noticed that the cement pavers on my patio were scratching my metal hoop so I found an old towel to put down to protect it.
  5. Not to worry because I switched to the 220 grit sand paper and that really started to clean it up. The sand paper cleaned off the rust and a lot of the black dirt. It also filed down any of the scratches that were rough. My hoop started getting shiny.
    IMG_9581

    Protect the hoop from scratching on concrete.

    This was extremely dirty and my hands, arms, face, shirt all started turning black. LOL. It was so messy & I was outside in 90 degree heat so it was everywhere.

    IMG_9584

    So dirty!

    IMG_9585

    Result of my cleaning supplies.

  6. Then I found a Scotch-Brite sponge scrub pad and some dish soap to wash it. I took a garden hose and soaped it up.
    IMG_9586

    Dawn and Scotch-Brite Scrub Pad.

    Initially, I was just going to use the sponge but once I started washing it a lot more of the black, dirty grime started coming off. I switched to the green scrub side and this REALLY helped clean the hoop up. Now it was shiny!

  7. I dried it off with a towel and set in out in the sun to dry.
    IMG_9587

    Its all clean and shiny!

    IMG_9588

    Look at the shine. No more rust.

What I would do differently

If I were to do this again (and I’m not sure how it will work now that I’ve spray painted the hoop)…

  1. After removing the tape, I’d wash it first with the sponge and soap
  2. Use the GOO GONE right away
  3. Then maybe take the Scotch-Brite scrub to it
  4. If there is still grime and rust then I’d use the sand paper
  5. And finally if needed I’d use use the Navel Jelly.

Spray painting the Lyra

This was easy. I saved this screen shot from Steve Santos with the idea of following it to a T.

IMG_9557

Screen Shot from a Facebook’s Safety in Aerial discussion about rust on hoops.

I went to Home Depot to buy supplies and called my Fiance to see if we had a “torch.” We do but he told me I didn’t need to use it (I think he didn’t want me burning down the house.). That all I needed to do was leave the hoop in the Florida sun to heat up and dry off all the moisture. I understand that there is still a ton of moisture in the air and I probably should have heated the hoop up but I’m learning to pick & choose my battles with my Honey Bunny and this was one I didn’t want to fight so I let it go. My hoop did get very hot in the sun so hopefully it worked **Fingers crossed**

  1. Bought Rust-Oleum Primer and Spray Paint. The color isn’t going to matter but I really liked the light metallic champagne pink color.
    IMG_9576

    Spray paint!

    ***LOOK at this sparkly  glitter spray paint. OMG! I didn’t know if I’d actually use it but it was too cool not to buy. I was thinking about using it and not taping the hoop and maybe the glitter would act a bit more grippy. When I mentioned this to my Fiance he didn’t think the glitter paint would stay on very long and would scratch/peel off right away with use. Anyone have thoughts on this? I’m not brave enough to try it yet***

  2. I hung it on my rig outside by one spanset and started spraying the primer.
    IMG_9593

    Hung it outside from one spanset.

    I did a light coat about 6-12 inches away from the hoop. Let it dry for about an hour. then moved the spanset to the other side and did another light coat. Then I let it dry for 2 hours and brought it inside to dry overnight.

    IMG_9595

    First coat of primer.

  3. Then the next day I did the same thing with the champagne pink spray paint. It actually started raining about an hour after I sprayed. Once it stopped I took it down and dried it off and set it inside to finish drying.
    hoop

    Metallic Champagne Pink Spray Paint. I LOVE this color!

    hoop2

    Its almost the same color as my wall.Taping my Lyra

Taping my Lyra

When I was first purchasing hardware for my Lyra I bought some Mueller’s Athletic tape knowing I’d eventually need to re-tape it. I found it on Amazon.

tape

Mueller Tape 3 rolls, 1 1/2 inch x 10 yards

tape2

Comes in many colors!


This is what I found when searching for how to tape a Lyra (tape an aerial hoop). Its a lot like taping a hula hoop. These are some helpful tips:

  • Tape from the bottom to the top. if you don’t do this then the tape will roll over on itself as your hands/body slides down the hoop.
  • If you look at the hoop as a clock with 12 at the top. Start taping at 7 going up to the top towards 1. Then go the opposite direction starting at 5 and going up towards 11. This gives you some overlap at the bottom where there is most wear.
  • Here is a video that shows a taping tutorial.

In all it took less than 20 minutes and I thought this was the easiest part of this entire process.

  1. I started the tape at 7 on a clock and wrapped around the hoop tube it so it overlapped itself 1/2 the width of the tape.
tape3

Starting the taping.

2. I tried to keep the tape tight against the hoop to keep any wrinkles out.

tape4

I started at about 7 on the clock.

IMG_9665

This was one roll of 10 yards of tape.

3. Once I finished one roll of tape. I took a second roll and started at the 4/5 on a clock and started wrapping clockwise. This roll seemed to have more strings come off the tape. A few times I had to stop and turn my roll of tape over so the other side of the tape was being overlapped to keep it from unraveling. (I guess I’ll see how that works out.)

IMG_9668

The second roll I started at 4/5 and wrapped clockwise.

4. Using the second roll of tape I was able to complete the hoop part and go all the way across the straight part and ended where the hoop starts to curve again. I had just a bit left on the roll.

IMG_9670

Finished! OMG its like I have a new hoop!

5. The hoop is SO BEAUTIFUL. It looks like a brand new hoop! Why didn’t I do this sooner?

IMG_9671

It matches all my other pink stuff.

Please let me know if you have any other suggestions or if you tape/protect your hoop in different ways.

Types of tape that people use to cover their Lyra:

  • Mueller Athletic tape (M-Tape)
  • Generic athletic tape / adhesive cotton tape (ie. Zonas Zinc Free tape)
  • Newbaums handlebar tape (its soft & not sticky)
  • Hockey tape
  • Some people use foam pre-wrap or under wrap under the tape for padding or use several layers of cotton tape
  • Gaffer tape (heavy cotton cloth with strong adhesion properties, typically used to tape down cables to the floor during stage productions, try the brand Polyken, tends to be expensive)
  • Baseball/tennis racquet tape
  • Soft side of velcro tape (??)
  • ESI Silicone tape

Ways to decrease stickiness of a taped hoop:

  • Put chalk on in
  • Coat it with acrylic paint
  • Instead of chalk dust a fresh tape job with shimmer powder
  • Someone posted that “zinc” in the tape is what gives it the sticky goo so look for zinc free tape

UPDATE: 10/16/16 The Mueller Tape that I used is SUPER sticky! It really eats up my hands. I’ve just seen a recommendation for Meister Tape. I think it can be purchased off Amazon. I’ll probably try that next time. 


Aerial Equipment part 3: Mats! 

Mats are VERY important safety tools when doing aerial. Many of the aerial studios I’ve trained at have 1 1/2″-2″ panel mat beneath the aerial points. For new or difficult tricks (especially drops) I like to pull a 4-12″ crash mat under the point. I have heard many differences in opinion on what size, type, or the safety of mats that are needed for aerial. I would love to hear in the comments what types of mats you use for training!

My opinion is: I LOVE MATS and the more mats I have the more confident I feel.

Please check out this link to more info about aerial mats: Simply Circus website mats section.

This is a run down on the mats that I have and use at home, where I bought them, and how much they cost.

Round 1:

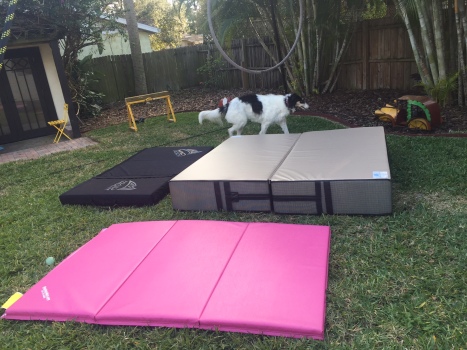
When I first started aerial I also did some pole dancing. I bought a pole and a small pink panel mat for home use. I bought the mat brand new about 4 years ago off eBay. It is a MatsMatsMats.com mat. It folds twice and is 4×6′. I use it to stretch and it is a great little mat.

mats5

I also use yoga mats and I have a gray foam fitness mat that rolls up. * I just ordered a new yoga mat from Amazon because my little chihuahua had an accident on mine and…well…I just decided it was time for a new mat.
Screenshot 2016-02-27 17.00.15

Round 2:

When I bought my Lyra I wanted a mat that was a bit more robust than a panel mat. My instructor told me that in a gym she trained at they used bouldering pads as mats. I went home and Googled.

Mats are freaking expensive! Wow! (If you don’t believe me do some googling…)

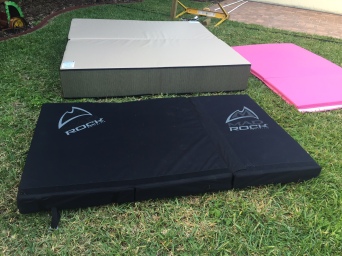
Bouldering/rock climbing crash pads come in all sizes and costs. I choose a Mad Rock Climbing 5″ thick Crash pad.
mats3

  • It is black and 72″x44″ (6 ft x 3 1/2 feet) when laid out.
  • It folds twice into a 24x44x15″ backpack.
  • I choose it because it had good reviews and I could use Amazon Prime.
    Total $250-260.


Pros:

  • Largest portable crash mat on the market
  • I like the 5″ thickness (seems better than a panel mat to me)
  • It’s portable and easy to carry
  • The folds have Velcro coverings so you don’t step into a crack
  • You can sleep on in as a portable mattress if you want 😴
  • (It works great under my slackline…)

Cons:

  • It still seems small to me. I feel like to be completely safe I want 2 of these mats put side by side.
  • It is very firm but over time I think it will relax.
  • I hated the orange logo so I took some fabric paint to it.


These are some other bouldering crash pads I considered:

  • Black Diamond
  • ClimbX-XXX
  • Metolius

Round 3:

Now that I’ve gotten my 24 foot Ludwig Aerial Rig, I really wanted a big crash pad so I can start trying some more advanced skills. And again…

Mats are freaking expensive!

A lot of the 8-12″ crash/landing mats that are used for gymnastics/acrobatics/trampoline/martial arts are rectangles. One problem that I’ve had with aerial is that I pull a mat under me there is a length that is too long and one that is too short. I need to direct my trajectory so I land in the right place. Not a huge issue but it’s been an annoyance for me.

*Anyone else have problems with this, or is it just me?

I thought if I’m going to spend $$$ on another mat…I want it to be a mat that works for me. These were my requirements:

  • 6 foot x 6 foot (a square not a rectangle)
  • 12″ thick
  • Light color (the mat will be outside & the sun heats vinyl up quick in Florida)
  • Portable & easy to store (needs to fold once and have handles)

Then I did a web search and sent out quotes for estimates to 7 different suppliers. (Side note a few replied right away with estimates via email, a few I needed to call to get a response & a few never did respond.) It is worth while to shop around. The prices vary greatly as do the quality. This is what I found:

  • AK Athletics $625 free shipping, no tax. WINNER!!!
  • Resilite $530 + shipping $181 + tax $49.77 = $760.77
  • CoverSports $626.27 + shipping $135.00 = $761.27
  • MatsMatsMats $714.99 + shipping $331.60 = $1046.59
  • GreatMats responded they could not build to my requirements. *I was looking through their website and saw some tiles made out of recycled rubber like they have in some playgrounds…the bouncy kind…I was considering that under my aerial rig because I’m pretty sure the grass is going to die pretty soon. What do you think, good idea/bad idea?
  • RossAthletic & The Mat Warehouse did not respond. 😦

I went with AK Athletics because:

  1. They were priced the best & had free shipping: $625
  2. They were the first to respond.
  3. I liked their customer service the best.
  4. 6’x6’x12″, Tan on top/Black on bottom, folds once, handles on the folded sides.
    Order was placed 1/18/16, shipped 2/1/16, received 2/4/16 (signature required)
    Screenshot 2016-02-27 17.10.12mats2

Pros:

  • This mat is super comfy. * I could easily fall asleep on it.
  • The vinyl is very soft to the touch.
  • It is thick and heavy. The perfect crash mat.
  • I had thought that I might choose something bigger like 8×8′ or 10×10′ but 6×6′ is perfect size for aerial use. *Although for hoop…the 5 inch Mad Rocks on top of my grass works just fine!

mats1

Cons:

  • This mat is LARGE! I cannot lift it by myself (I thought I’d be able to lift it with the handles…). It is easy to drag but not lift. My fiancé is already questioning where everything is going to go. Ugh! I have no where to store it.
  • The seam runs right under my aerial point. I’m afraid that it will come un-done over time. It already looking worn and the seam is pulling apart after just 4 uses. I believe I will use a yoga mat on top of it to try to reduce some to the wear that will happen to it. I will keep you updated.
    mats6
  • The vinyl got REALLY cold (too cold for bare feet when it was around 55 degrees out. I’m worried about how hot it will get during the hot summer days in Florida. Maybe my yoga mat will help. Or maybe I will need to get some type of rug for the top of it.

So far I’m very happy with how my private aerial area is coming together. It has been a great (& expensive) learning experience. Please let me know if you have any questions. And I hope everyone is having a safe and happy aerial time!!

**I am NOT an aerial instructor. I am NOT a professional. My ideas for mats and safety may not be the same as yours or what a professional aerialist/rigger/instructor recommends. Please refer to a professional if you have questions. Facebook Safety in Aerial Arts Group is a great resource.

Aerial Rigging: kN? 

What the heck does “kN” mean and what does it mean to me as an aerialist?

kN confused me as I was beginning my aerial hardware/equipment research. I had to look it up and refresh my physics memory. *If I ever learned what kN meant when I took physics I definitely don’t remember it.

kN = kilonewton

Newton (N) is the international system of units (SI) for FORCE. Named after Sir Isaac Newton. One N is very small. A N is so small (at Earth’s gravity 1 N = a small apple) it is common to see forces expressed in kilonewtons (kN). When we see kN stamped on our hardware, it gives a measurement of what kind of forces it can withstand, or how strong it is.

This chart has helped me when looking up ratings and applying them to aerials:

kN (kilonewton) to lbf (pounds-force)

1kN = ~225 lbf
5kN = ~1124 lbf
10kN = ~2248 lbf
20kN = ~4496 lbf
30kN = ~6744 lbf
40kN = ~8992 lbf
50kN = ~11,240 lbf

Here is a simple calculator to convert kilonewtons to force pounds.

How do I calculate how much force I create as an aerialist?

This is a video of how much force an aerialist can create from just a simple drop.

This link shows how to calculate your weight and shock loads as an aerialist. It’s an eye opening read.

What does this mean to me?

  1. According to the link above there are a wide range of safety factors. You will need to decide which works best for you and your practice (*you may want a smaller SF if you are doing static motions with no drops, larger SF if you have multiple aerialists doing large drops, or different SF depending on if its for permanent equipment used daily vs temp. equipment used rarely):
    • 2,000-5,000 lbs (same as a car) = 9-22kN
    • Cirque du Soliel 10:1 SF (est. 900 lbs for in a drop) = 40kN
    • American National Standards Institute 7:1 SF (est. 900 lbs for in a drop) = 31kN
    • Professional artists standard 3:1 to 5:1 SF(est. 900 lbs for in a drop) = 12-20kN
  2. I can convert the ratings of my equipment into something more familiar to me. *Example: a carabiner with a 25kN label is rated to roughly 5500lbs.
    • My carabiners are 23-50kN (5,170-11,240lbf)
    • My swivel is 36kN (8,093lbf)
    • My aluminum rescue 8 is 45kN (10,116lbf)
    • My rigging plate is 30kN (6,744lbf)
    • My fabric is the weakest part of my rig at breaking strength around 2,000lbs. (With fabric it is more likely to tear before it completely breaks. Simply Circus Fabric testing)
  3. Knowing how my equipment is rated will also help me keep an eye on when it needs to be inspected and retired.
    *Sometimes I will practice a lot of static moves with slow fluid transitions. Other times I get in a “drops” mood and all I want to do is drop after drop. The drops are going to generate more force and more wear on the equipment.
    I should be inspecting my equipment more often when I’m creating more force on them. Consider how you are using your equipment and the forces you are putting on them.

Use the information above (kN/forces/ratings/calculations) to help make smart decisions about your aerial equipment. If you are unsure or confused, please ask for help and do more research.

NOTE: All carabiners (and other aerial hardware) have a kN amount etched into the spine. If they do not have an etching amount do not use them for aerial.

Other definitions:

  • Load definitions link
  • WLL = Working Load Limit
    The force that a object can safely lift without breaking.
    WWL = MBL (minimum breaking load)/SF (safety factor)
  • SF = safety factor also referred to as DF = design factor
  • Force = mass x acceleration

What are other things that you’ve found in your aerial or circus research/experience that has caused confusion or raised questions? There are other aerialist out there (like me) who have also been wondering the same things.

***I am NOT an aerial instructor or rigger. I am NOT a professional. My ideas for saftey may not be the same as yours or what a professional aerialist/rigger/instructor recommends. Please refer to professionals if you have questions. Facebook Saftey in Aerial Arts Group and Simply Circus site are a great resources.***

Aerial Rigging: Carabiners/Quick Links/Shackles? 

Early in my aerial training one of my instructors asked me to “check a carabiner.” Sure, no problem. Look at it. Check! Make sure it’s locked. Check! Easy peasy! Now I try to make a habit of checking biners whenever I go up on equipment. Yes, I have found a few carabiners that were not locked, carabiners that were cross loaded, carabiners that are overloaded and carabiners that are stuck closed/open or damaged. As an aerial student it’s important to ask questions and learn about the equipment you are using.

As I was writing this blog, I found these videos from Vertical Art Dance. Please take a few minutes to watch them. I learned I was currently making rigging mistakes. I’m heading back to make some new purchases and update my hardware. I need to stop relying so much on carabiners and think about using Quick Links and shackles more often.

Aerial Rigging The Carabiner Talk Part 1

Aerial Rigging The Carabiner Talk Part 2, Overloaded Carabiners
*I have been overloading my spansets for my lyra into carabiners.

Aerial Rigging: The Carabiner Talk Part 3, 3 Way Loading
*I have been 3-way loading my lyra spansets onto one carabiner. I knew it wasn’t ideal but I didn’t know it was a bad mistake.

Why is this important? Remember the Ringling Hair Chandelier accident? It was due to an improperly loaded connector. Review the article and some of the comments. Then look around at what is being used at your studio or your own set up and ask questions. Is it safe? Is there a better way to rig it? Why did they/you decide to rig that way?

Here are some tips about connectors for aerial rigging:

CARABINERS

  • Before use, carabiners (and all connectors) should be inspected. Damaged or worn carabiners/connectors should NOT be used. Visually check for any stress. Look for bending, corrosion, excessive wear, or cracking. The locking mechanisms should have smooth operation. If it doesn’t take it out of service and don’t use it.
  • Carabiners need to be oiled (& cleaned) regularly. Sometimes locking biners stop working just because they haven’t been oiled.
  • Screw down, so you don’t screw up! It may not be a huge deal in aerial, especially if you are using auto lock biners, but it can help keep screw gate carabiners locked if there is anything that might rub on the screw gate and unlock it. Examples: a hand grabbing the biner, a knee locking around it, a rope/spanset rubbing against it, or even vibrations loosening the the screw. This video explains in a bit better. Not much of an issue with auto lock biners but its not a bad habit to get into for all biners just in case. *If you don’t know the difference between a screw gate and an auto lock carabiner please watch the above videos again and read the Simply Circus link below.

Carabiners are designed to take a load only along the major axis:

  • Do not cross-load a carabiner. Loads should only be placed lengthwise along the major axis. If a carabiner is loaded widthwise it could fail especially with a drop or abrupt change in motion. They are a lot less strong widthwise (up to 70% less).
  • Do not overload a carabiner. Review Video Part 2 again. Spansets can easily overload a carabiner. Rigging a silk directly to a carabiner will also overload it.https://rescueresponse.com/wp-content/uploads/2014/11/RoundSlingBinerBreak.jpg
  • Do not 3-way load a carabiner. Review Video Part 3 again. I’ve seen this a lot in rigging. So much that I thought it was normal. But its not. It is a mistake in rigging. See above pictures of rigging a double-point Lyra. Have you rigged this way? Which way is the best?
    Riggers have been lucky only because they use a large safety ratings (2000-5000 lbs). It is a better idea to use hardware that is designed for 3-way loads (an anchor shackel or a Quick Link).
    This is an interesting video that shows testing tri-loading carabiners. Its focus is on slacklining, not aerial, but its still good info.
  • The D-shaped carabiners are usually stronger than the oval carabiners…but only if the load is verticle down the long end of the carabiner. *I’m re-thinking how to rig the pulley on my outdoor rig I was going to use a 50kN steel D-shaped biner at the top but now I might look for a Quick Link or shackle so its not overloaded.

Please read this reference on carabiners from Simply Circus: Carabiners.

There are tons of places to buy carabiners. I’ve purchase mine from Aerial Essentials and Fusion Climbing. I like the sleek black coatings that they offer. They are more expensive than the regular stainless steel biners.

*I’ve been buying steel (vs aluminum) carabiners because I believe they will last longer than aluminum. I am planning to write a blog about that debate.

SHACKLES

I have heard/read that many professional riggers are recommending using shackles instead of carabiners. Especially if it is a permanent connection. Carabiners are designed for quick/temporary connection.

  • Shackles are a lot stronger than carabiners
  • 2 main types of shackles: Anchor/Bow shackle can connect 2 or more rigging pieces together while a Chain/”D” shackle is designed to connect components in a straight line. See the Simply Circus link below for more info and pictures.
  • Shackles will decrease the amount of height lost when using a carabiner (average shackle is 3″ vs 5″ carabiner).
  • For aerial you can use a screw pin shackle that can be moused/locked in place with a zip tie after they are screwed tight. (You could also use metal wire to mouse it.)
  • UPDATE: Load only in one direction on the pin of a shackle. Use the bell to collect the legs of a bridal. (In other words: when 3-way loading, put 2 loads on the bell and 1 load on the pin.)
  • My fiance calls them “bull nose” As in: “Amy, why are you using carabiners when you should just get a bull nose? They are safer for you.” (I had no idea what he was talking about. Until now)

Please read this reference on shackles from Simply Circus: Shackles. This link has a ton of information with pictures of different shackles, how to inspect & clean and even how to mouse a shackle.

You can buy shackles MANY places. This is an example of all the different types at Rigging Warehouse.

QUICK LINKS

I’m just learning about Quick Links (or screw links). I didn’t even know what they were up until about a month ago.

  • Quick Links come in several different shapes. Depending on your need, you may want to use a triangle/tri-link/delta/square Quick Link to attach spansets to a swivel for a double point lyra (instead of 2 carabiners into a swivel-see Part 3 video above)
  • To avoid overloading a carabiner with a spanset, consider using a Quick Link (again I refer back to the videos above). Review the Quick Link shapes to see which may be the best fit.
    Update: Delta and tri-link Quick Links are for vertical use only. They are wider to be used with webbing.
  • Link to Petzl Maillion Rapide technical info
  • Ratings are significantly lower when cross-loaded. (Ex. a Quick Link that is rated 25kN on major axis can be rated 10kN on minor axis)
  • When tightened with a wrench Quick Links can be considered a permanent connector.

I am attaching several links that have more Quick Link information:

Aspiring Safety Products:  This has Quick Link ratings and a description of why and what they use particular shapes.

You can buy Quick Links at MANY places. This is an example of all the different types at Rigging Warehouse. I’ve read that many people recommend Maillion Rapide Quick Links because they have very good reliability.

I’d love to hear your thoughts on connector use and aerial rigging?

*Interesting solutions to “fix” tri-loading carabiners and spansets (or Quick Links) from a slackline point of view. Remember to consider the ratings on the spansets when putting them into different shapes: basket, chocker, etc.  Triloading 101

Aerial Equipment part 1: Buying a Lyra

***I am NOT an aerial instructor or rigger. I am NOT a professional. My ideas for safety may not be the same as yours or what a professional aerialist/rigger/instructor recommends. Please refer to professionals if you have questions. Facebook Safety in Aerial Arts Group and Simply Circus site are a great resources.***

Originally buying my own equipment wasn’t in my plans. I really didn’t need my own equipment. …but I fell in love with a special lyra.

Last year I took a class at Circus-Arts in Polk City, FL. I practiced on a hoop and we bonded. Csaba had made it himself…a one of a kind. It was the perfect size, shape, and movement for me. I loved it. It stayed in the back of my mind for a long time. Throughout year I attended classes there about once a month, one day I asked him if he would make another for me… or if I could buy that hoop. A few weeks later, I was a new owner of my very own aerial hoop.

It cost $250. Very reasonable price for a hoop. Plus I didn’t have to pay shipping.
*I am finding shipping is a HUGE expense when it comes to buying aerial equipment.
Csaba tried to give me a couple of spansets but I wanted shiny new hardware. (In hindsight, I should have taken those spansets …because although spansets are each fairly inexpensive, when you start buying a few in several different lengths, the price adds up.)

Next, I needed to figure out what hardware I wanted to complete my set up. I would need at least 2 spansets, 2-3 carabiners and a swivel. I knew from being a part of the Safety in Aerials Facebook group that I needed hardware that would hold up a car (2000-5000 lbs).
*A Cadillac Escalade weighs 5,949 lbs.

Where do I find that type of hardware? First, I asked my instructors. Then I went to the most likely websites…ones that sell aerial & circus stuff. These are some of the sites I found but there are many others:

I also went to climbing and rigging websites:

  • Sapsis Rigging -the website is a bit difficult to search but keep at it or call them to help
  • REI (I have not had good luck with specifics from them)
  • Dick’s Sporting Goods
  • Gear Express
  • Rigging Warehouse – its a bit of a process to get registered & order
  • Bill Jackson’s (The only climbing gear store I know about in Tampa Bay)

I’m analytical and enjoy list making and comparisons. I priced everything and looked up ratings. Then I took the info and made charts. All of this was somewhat confusing for me. I’m a newbie to rigging and I wasn’t quite sure what all the terms meant. I couldn’t always find ratings or know if it was OK for aerial. I think this is normal for a lot of aerialists but it meant I needed to keep doing research.

SWIVEL & BINERS

I ended up ordering hardware from Aerial Essentials because I felt that they had a good website, I knew of other aerialists who have their hardware, and they listed all the ratings in a way that was easy for me to understand. However, now that I’ve done more research, I’ve looked back at their website and have questions about some of the biner ratings and what I received. *2/1/16 Aerial Essentials updated their website & is consistent with what I received.

I bought 3 carabiners thinking I may need one for each spanset connected to the swivel then one to connect to the rigging a point. I also thought about buying a spreader plate & a 4th biner because that would keep the carabiners and swivel from being double loaded. That is probably the best and safest set up but I thought it would take up a lot of room since I was trying to conserve my ceiling height.
*Now that I’m writing this I think I may buy a spreader plate and set it up this way for my aerial rig since height won’t be an issue.* 

Currently, I use 2 carabiners & a swivel. I put both spansets in one carabiner. Attach it to the swivel and then a biner to the rigging point. It’s nice to have an extra carabiner just in case. I also wanted to feel/see the difference between the auto lock & screw gate so I bought both. The auto lock is D shaped. 

UPDATE: 2/1/2016 After doing more research on carabiners (see my carabiner post), I’ve learned that this rigging of a double point Lyra is a mistake. Use of spansets in carabiners will overload the carabiner make it dangerous. Carabiners were not designed for that type of use. Also, tri-loading a carabiner with 2 spansets and a swivel is bad. I’m purchasing some Quick Links or shackles and a rigging plate and post more updates. 

  • X1 Swivel black, aluminum (with stainless steel bearings): 8,000lbs/36kN (Brand Fusion) -Aerial Essentials $45
  • X1 Carabiner black, steel auto lock  (4.5×2.5″): 50kN (Brand Fusion Tacoma, etched 50kN) – Aerial Essentials $17
  • X2 Carabiner black, steel screw gate  (4.5×2.5″): 25kN (Brand Fusion Ovatti, etched 25kN) – Aerial Essentials $15

Total: $98.10 with shipping.

SPANSETS

My Lyra is a tabless, trapeze/straight top, 36″ tall and about 39″ wide.

I needed 2 spansets for it to use as ropes. Searching the Facebook Safety in Aerial Arts forum, I found that Liftall Tuflex is a common brand sling used in aerials.

NOTES:

  • There are many brands and types of spansets out there. Being a newbie to aerial rigging I stuck with what I have seen/used and what was recommended. Common names if you’re searching online: spanset/Span Set/sling/roundsling/stage sling.
    *My Fiance, who is a metal worker/contractor, had no idea what I was talking about when I said “spanset” but I showed him a picture and he called it a sling.*
  • Spansets are usually color coded depending on weight ratings. Violet/purple and green are what I have seen used with Aerial rigging and were recommended by my aerial instructor. I decided green spansets would be good for my use. Mostly because I’m trying to be super safety conscious & I liked the higher ratings.
  • It’s a good idea to keep the labels intact on the spanset otherwise all warranties are void.
  • Also, regular inspections are necessary. Each spanset should come with instruction/warnings about how to inspect them. (I keep a notebook with dates of inspections along with all the specs and purchase dates.)

I priced a dozen different websites before purchasing. I wanted green-rated spansets with black covers and found a recommendation for Sapsis Rigging on the Facebook Safety Group.

Sapsis has several “in stock” spansets and also they will also custom-make sizes if you call and request them. They also were the best price I found for green-rated/black-covered. Unfortunately, the size I actually needed for the studio was not a size they had in stock. And I didn’t know it until I actually rigged it at the studio. I was impatient … I ordered green 4ft ones off of Amazon (Goodness, I’m addicted to Prime!). If you know what size you need you can get away with buying a few spansets. But I like having my options…I bought 8 in four different sizes.
*I called for 4.5′ black-covered spansets and they quoted around $19 each.

Liftall EN60X4 Tuflex sling: Verticle 5300/ chocker 4200/ basket 10600lbs:

  • X2 1 ft green: Sapsis (black) $7.83 each
  • X2 3 ft green: Sapsis (black) $10.17 each
  • X2 4 ft green: Amazon (green) $15.13 each
  • X2 6 ft green: Sapsis (black) $17.20 each

Sapsis (+shipping $14.48) $84.88 + Amazon $30.26 = $115.14

OTHER STUFF

I also bought some athletic tape for the lyra so I can recover it when needed (the gray isn’t my favorite color). I couldn’t decide on a color so I bought black and pink and also gray just in case I wanted touch up the current tape. Maybe I will make a blog when I re-wrap it for the first time.

  • Mueller M-Tape Canister (3 Rolls/Pack) Black (1.5′ x 10 yds) Amazon $11.62
  • Mueller M-Tape Canister (3 Rolls/Pack) Gray (1.5′ x 10 yds) Amazon $11.62
  • Mueller M-Tape Canister (3 Rolls/Pack) Pink (1.5′ x 10 yds) Amazon $11.62
    Total: $34.86

When I finally rigged everything and put the Lyra up in the studio the black coating on the carabiners and swivel rubbed together and makes a creaking noise. I sent an email to Aerial Essentials asking if it was normal and if there was a fix. They recommended using graphite to lubricate it.

  • L-300 Powdered Graphite Lubricant 21.oz: Amazon $6.21

My first jump into owning my own aerial equipment cost me: $504.31

***This is the what I choose to buy & some of my reasons why I chose what I did. It may not be the safest or right choice for you.***

NOTES:

I could have searched and found the hardware cheaper (the black coating costs extra, buying directly from manufacturers costs less) or not bought one carabiner and only bought one set of spansets  …I could have done it for about $360 total (maybe less).

But I’ve already brought my Lyra to a workshop where I needed different size spansets. I also lent some hardware to friends for a NYE performance. Now, I’m going to need the 6-foot spansets for my new outdoor rig (Yep…that will be another blog subject). I am using all the equipment I’ve bought. And have plans to buy more.

This is just the beginning when it comes to aerial equipment. I also need mats. Mats are necessary for aerial safety. Mats are freaking expensive!! (Future blog subject!) Aerial is not cheap. Expect to spend money if you start buying equipment. Plus you still will need to find a safe place to rig it (Future blog subject!). Luckily, I have a few awesome aerial studios that will let me rig from one of their aerial points. Plus, I’m getting a portable aerial rig of my own soon.

lyra

This was my Christmas card on my new hoop and hardware.

Aerial Introduction

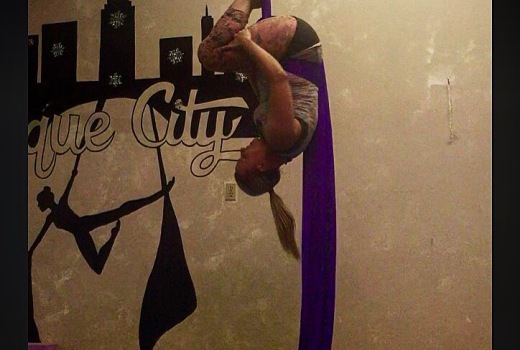
I was born to be upside-down. This blog will be about my path to follow my aerial/circus desires. It will be about my practice (aerial hoop, fabric/silks, trapeze), about my health, and anything else that grabs my attention (my dogs, flexibility, weight, handstands, hooping, etc.)

IMG_0174

Gymnastics was my outlet as a kid and through college. It was my passion. My love. I thought I wanted to coach or open my own gym. Then graduation and reality struck. I was hired by a great medical device company and I coached at night. As I moved up in my company I lost the time and energy to coach. I made new friends. They convinced me to try softball, volleyball, and finally kickball. I was the girl who would tumble on and off the field. I’d get bored. I wanted to be upside-down.

Amy Windorski © Tigz Rice Studios 2012

Amy © Tigz Rice Studios 2012

2009 I found hooping. It was fun. It was dance. There was a flow with the hula hoop. And it was tricky! For a few years I immersed myself with the hula hoop. I ended up at a Hooping retreat in the mountains of Colorado. One of the instructors, Spiral, was a circus trained artist. She showed me hooping in a new light. She could handstand like no other and she performed on a hoop in the air. I wanted to do that. I wanted to be upside-down.

I found an aerial studio about 45-50 minutes from my home. I took my first aerial class Sept 2011. I was 34-years old, about 30 lbs overweight and out of shape. It was challenging. I remember more than one class that I left discouraged and in tears. I kept at it because it combined all the things I love: learning new tricks, performing, hard-work, flexibility, and strength. Plus I just wanted to be upside-down.

image

Lately, my situation changed with the studio I’d begun at and I’ve changed studios. I’m currently at crossroads with my training. I’ve gained weight again and have injuries. I’ve made some good (great actually) friends who are opening new studios in my area so I know I have places to train. However, my full-time job has hours that make it difficult for me to get to the studio for regular classes or open gym. I want to train when I can fit it into my schedule. I need to take what I do know and practice it and perfect it and make into routines. I do aerial recreationally but it is what keeps me sane.

My solution has been to start acquiring my own aerial equipment. This blog will be about me finding myself through aerial/circus.